Windows suddenly changed one of my hard drive partitions to RAW, and now I can’t open it or access any of my files. Disk Management shows the partition as RAW even though it was working fine before. I have important photos and documents on this drive, so I need help figuring out the safest way to recover data from a RAW partition in Windows without making things worse.
When Windows flips a partition to RAW, I would not hit Format. I know that prompt pops up fast, and Windows acts like formatting is the normal fix. If you’ve got anything on there you care about, stop there.
RAW usually means Windows lost track of the file system. I’ve seen this after a bad unplug, a crash, and once after a flaky USB dock. It does not mean your files are gone. It means the file system is no longer readable to Windows in its current state.
The first call is simple:
Are you trying to save the files, or are you trying to make the partition usable again?
If the data matters, I’d treat repair as step two. Get the files off first. Fix the partition later.
This is the order I’d follow:
- Do nothing to the RAW partition yet.
- Pull the files off to a different drive.
- Try repair tools only after recovery.
- If repair goes nowhere, rebuild the partition and format it.
Recover the files first
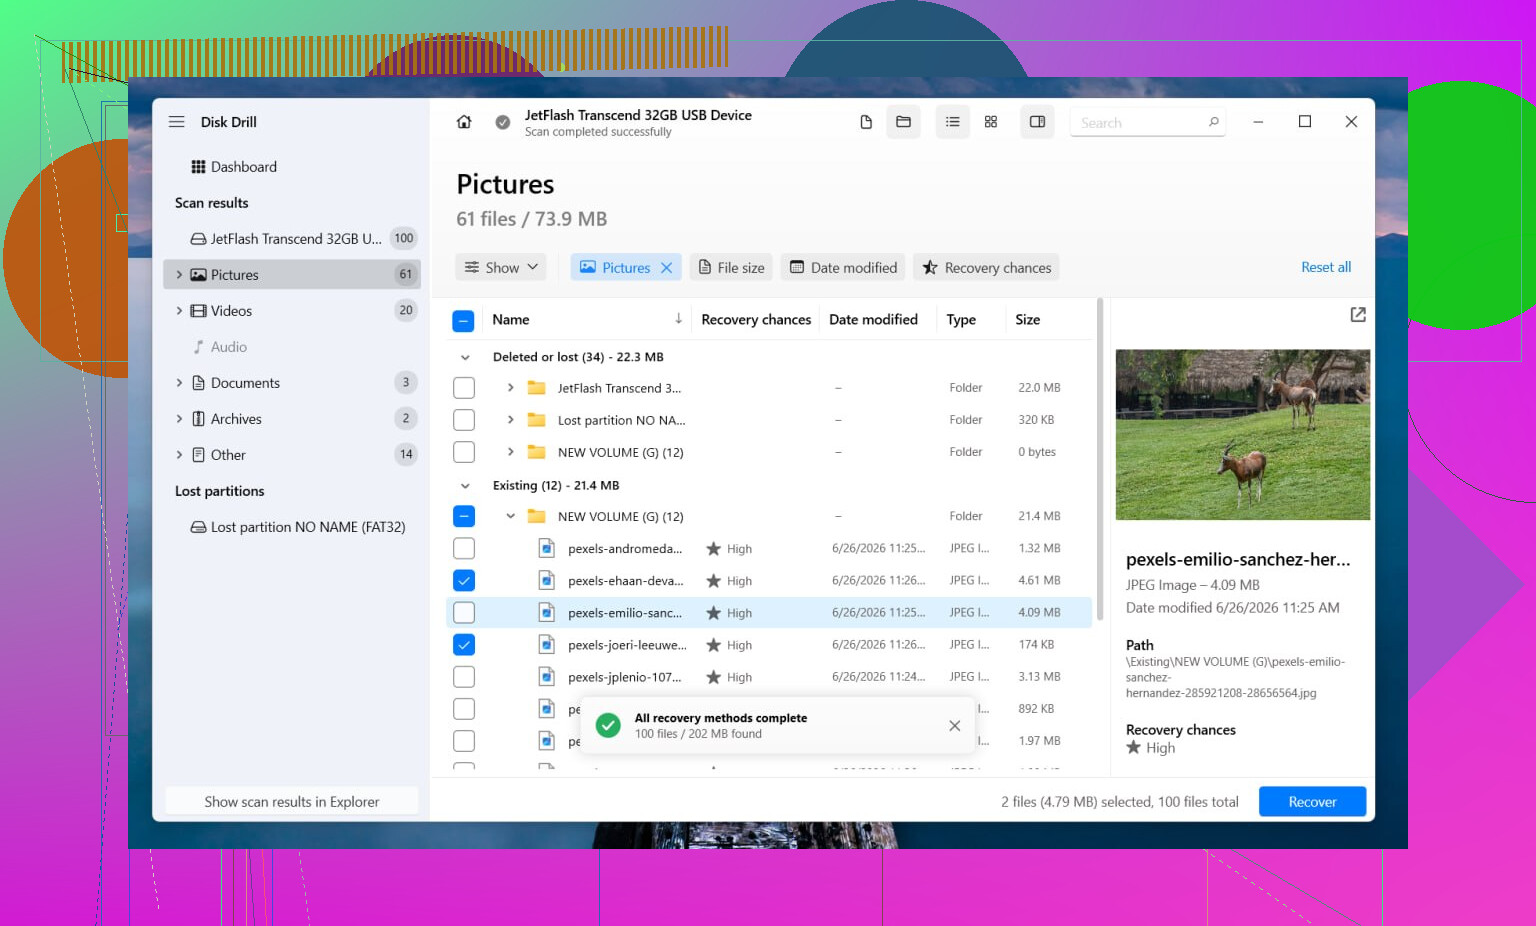
I’d start with Disk Drill. I used it once on an external drive that showed up fine in Disk Management but opened as RAW in Explorer. What helped was that it tried multiple recovery methods in one pass.
If parts of the old file system still exist, it often pulls files back with folder names and structure intact. If the file system is too damaged for that, it falls back to file signature scanning and looks for a long list of known file types. The preview tool matters too. I don’t like recovering 200 GB blind and finding out half the files are junk.
The basic flow is this:
- Install Disk Drill somewhere else, not on the affected drive.
- Launch it and pick the RAW disk or partition.
- Click Search for Lost Data. On an external drive, use Universal Scan if it asks. I’d only switch to Advanced Camera Recovery for footage from cameras, dashcams, or drones.
- Let the scan finish. Don’t cut it short unless the drive is failing.
- Preview the important stuff first.
- Recover everything to another disk.
If the drive is dropping offline, freezing, or doing weird reconnect loops, I’d make an image before I did anything else. Disk Drill has a sector-by-sector imaging option, so you work off the copy instead of hammering the original. I’ve done this with an old laptop drive once, and it saved me from rereading a disk that was getting worse by the hour. Slow, yeah. Worth it, yeah.
After the files are safe, decide if the partition is worth fixing
Once your data is elsewhere, then I’d try repair.
If the partition used to be NTFS, CHKDSK sometimes fixes boot sector damage or file system errors. Sometimes. I would not touch it before recovery, because it writes changes to the file system. If the partition was FAT32 or exFAT, I’d skip CHKDSK. Wrong tool.
If CHKDSK doesn’t help, or if I wanted something less blunt, I’d move to TestDisk.
What I’d do in TestDisk:
- Open testdisk_win.
- Create the log file.
- Select the problem drive.
- Accept the detected partition table type.
- Choose Analyse.
- Run Quick Search.
- If needed, follow with Deeper Search.
- If it finds the lost partition correctly, choose Write and reboot.
If TestDisk still comes up empty, I wouldn’t keep piling on random repair tools from old forum posts and download sites. I’ve seen people lose a whole weekend doing that. At that point, I’d open Disk Management, create a New Simple Volume, do a quick format, and copy the recovered files back onto the fresh partition.
Two things people skip over
If this drive is an SSD, don’t let it sit around for days while you decide. TRIM can wipe blocks in a way recovery tools won’t undo later. Timing matters more on SSDs than on spinning drives.
Also, if the drive clicks, vanishes at random, shows the wrong size, or fails to detect consistently, I’d stop trying home fixes. That starts sounding like hardware trouble, not a file system problem. I’ve pushed a bad drive before and made it worse, so yeah, lesson learned. In that case, a recovery lab makes more sense, especially if the files are the kind you can’t replace.
2 Likes
If the files matter, treat this like data recovery first, partition repair second.
Windows showing RAW means it no longer reads the file system. Sometimes the partition table is fine and only the file system header is damaged. Other times the drive has bad sectors and RAW is only the symptom. Big difference.
I agree with @mikeappsreviewer on one main point. Do not format first. I disagree a bit on CHKDSK though. I would skip CHKDSK at the start even on NTFS if the photos are important. It writes to the disk. If the structure is damaged, you want reads first, writes later.
My order would be:
-
Check SMART health with CrystalDiskInfo or smartctl.
If health is bad, or reallocations and pending sectors are rising, stop using the disk for normal scans. -
Clone the drive first if it shows errors, disconnects, slow reads, or weird noises.
Use ddrescue if you are on Linux, or another imaging tool on Windows. Work from the clone, not the original. This maters more than people think. -
Run recovery software on the clone or on the RAW partition.
Disk Drill is a solid pick here because it handles lost partitions and RAW file system scans well, and it gives previews before recovery. Save recovered files to a different drive. -
If your recovered folder tree is a mess, sort by file type and date first.
For photos, EXIF timestamps help a ton. Tools like ExifTool make cleanup less painfull. -
Only after recovery, try rebuilding or formatting the partition.
If you want a clean phrase for what you’re doing, think of it as data recovery from a RAW partition on Windows, not “fixing” the partition first.
One more thing. If this is an external drive, swap the cable, port, or enclosure before assuming the disk itself is dead. I’ve seen bad USB bridges make a healthy NTFS volume show as RAW. Dumb, but common.
This quick post on recovering data from a RAW partition on Windows covers the same idea in simple terms.

RAW does not always mean the partition itself is toast. Sometimes Windows just loses the filesystem handshake and throws the dumbest label possible. I mostly agree with @mikeappsreviewer and @techchizkid on not formatting, but I’m a little less eager to jump straight into “repair” scans unless you first answer one thing:
Is the drive healthy, or is Windows only showing a filesystem problem?
That matters a lot. If the disk is physically failing, every extra read can make recovery worse. If it’s just a corrupted NTFS/exFAT structure, recovery odds are usually pretty decent.
What I’d do that hasn’t already been covered:
- Check the partition in Device Manager and Disk Management for weird size reporting.
- If it’s an external drive, test it on another PC and, if possible, remove it from the enclosure and connect it directly. Bad USB bridge boards are sneaky little gremlins.
- Look in Event Viewer for disk errors like I/O, bad block, or controller resets. Annoying, but useful.
- If the files are only photos/videos, recover just the most important folders first instead of trying to pull back the whole volume in one shot.
For actual file recovery from a RAW partition, Disk Drill is still one of the more practical choices because it handles RAW drives well and lets you preview photos before restoring them. That saves time and avoids recovering a mountain of corruppt stuff you don’t need.
One tiny disagreement with both replies: TestDisk is powerful, yes, but it’s also the kind of tool people use confidently right before making things worse. If you’re not comfy with partition structures, don’t freestyle in there.
Also, this is a useful read if you want a clearer step-by-step on recovering a lost or RAW partition: step-by-step lost partition recovery for external hard drives
Short version: yes, you can often recover data from a RAW partition, esp if you stop writing to it now. Recover first, fix later. That part they got right.
I’m with @techchizkid, @viajantedoceu, and @mikeappsreviewer on the big rule: don’t format it yet. Where I differ a bit is this: before any deep scan, check whether the partition still has the correct size and start position. If Disk Management suddenly shows the right capacity but RAW, that’s often filesystem damage. If the size looks wrong, missing, or shifted, that can point more toward partition table trouble than simple corruption.
A couple things people skip:
- Run
diskpartthenlist diskandlist volumejust to confirm Windows sees the disk geometry normally. - If it’s an external HDD, try a powered USB hub or different enclosure. Low power can make a healthy volume mount as RAW.
- For photos specifically, check whether Windows can still see thumbnails through any old catalog app like Lightroom or Photos. Sometimes metadata caches help you identify what’s worth recovering first.
About Disk Drill since it was mentioned:
Pros
- Good at RAW partition scans
- Preview is genuinely useful for photos
- Can recover by filesystem traces or file signatures
- Interface is easier than TestDisk
Cons
- Deep scans can take forever
- Filename/folder recovery depends on how damaged the filesystem is
- Best results still require another drive for saving data
- Not the tool I’d trust first if the disk is making hardware-failure noises
My take: if the drive is stable and SMART looks fine, Disk Drill is a sensible first recovery pass. If the disk is unstable, clone/image first, then scan the image. After your files are safe, wipe, recreate, and test the partition. If it goes RAW again, suspect hardware, not Windows being weird.