I accidentally deleted important files from my SSD on a Windows 11 PC and emptied the Recycle Bin before realizing it. I’m trying to figure out the best way to recover deleted files from an SSD in Windows 11 without making things worse, since some of the documents and photos are really important. Any advice on safe recovery steps or reliable tools would help.
Hey,
I’ve had this happen, and yeah, deleted files in Windows 11 are often still recoverable even after they’re gone from the Recycle Bin. “Permanent delete” sounds final, but on Windows it often means the file entry is removed while the data sits there until something else writes over it.
Before I touched recovery software, I’d check the obvious stuff first, because people skip it and waste time:
- Recycle Bin. I know, obvious, but I’ve seen files land there when I thought I used Shift+Delete.
- OneDrive Recycle Bin, if your Desktop, Documents, or Pictures sync there.
- File History backups.
- Previous Versions on the folder where the file lived.
- Any other backup source, cloud account, USB drive, old laptop, or shared PC where you might have copied it earlier.
Big thing, stop writing to the drive if you can. Don’t install stuff on it. Don’t dump downloads there. Don’t move random files around. Every write cuts into your odds. On SSDs this gets uglier because of TRIM. Once TRIM runs, recovery gets a lot harder, sometiems impossible.
If the file isn’t in backups or any recycle bin, then I’d move to recovery tools.
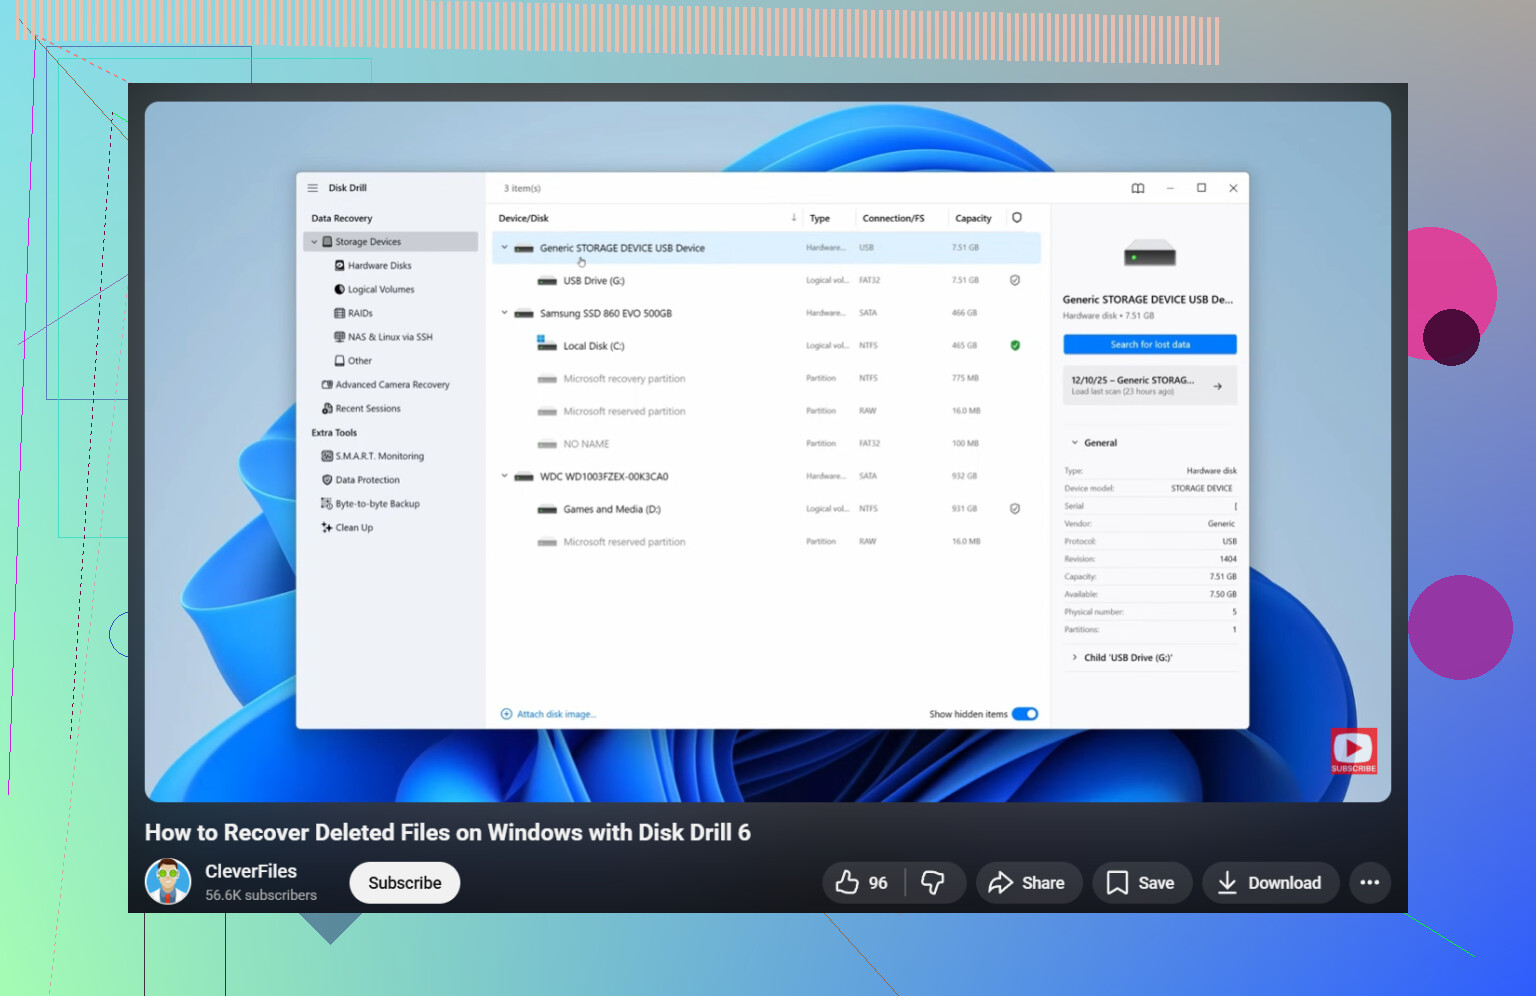
The one I’d try first is Disk Drill. I used it on a formatted USB drive and it was way less annoying than some of the older recovery apps. The scan found deleted files, and in my case it kept a lot of the original names and folders, which saved me hours.
The basic flow is simple:
- Install Disk Drill on a different drive if possible.
- Launch it and pick the drive where the files were stored.
- Click Search for Lost Data and let the scan finish.
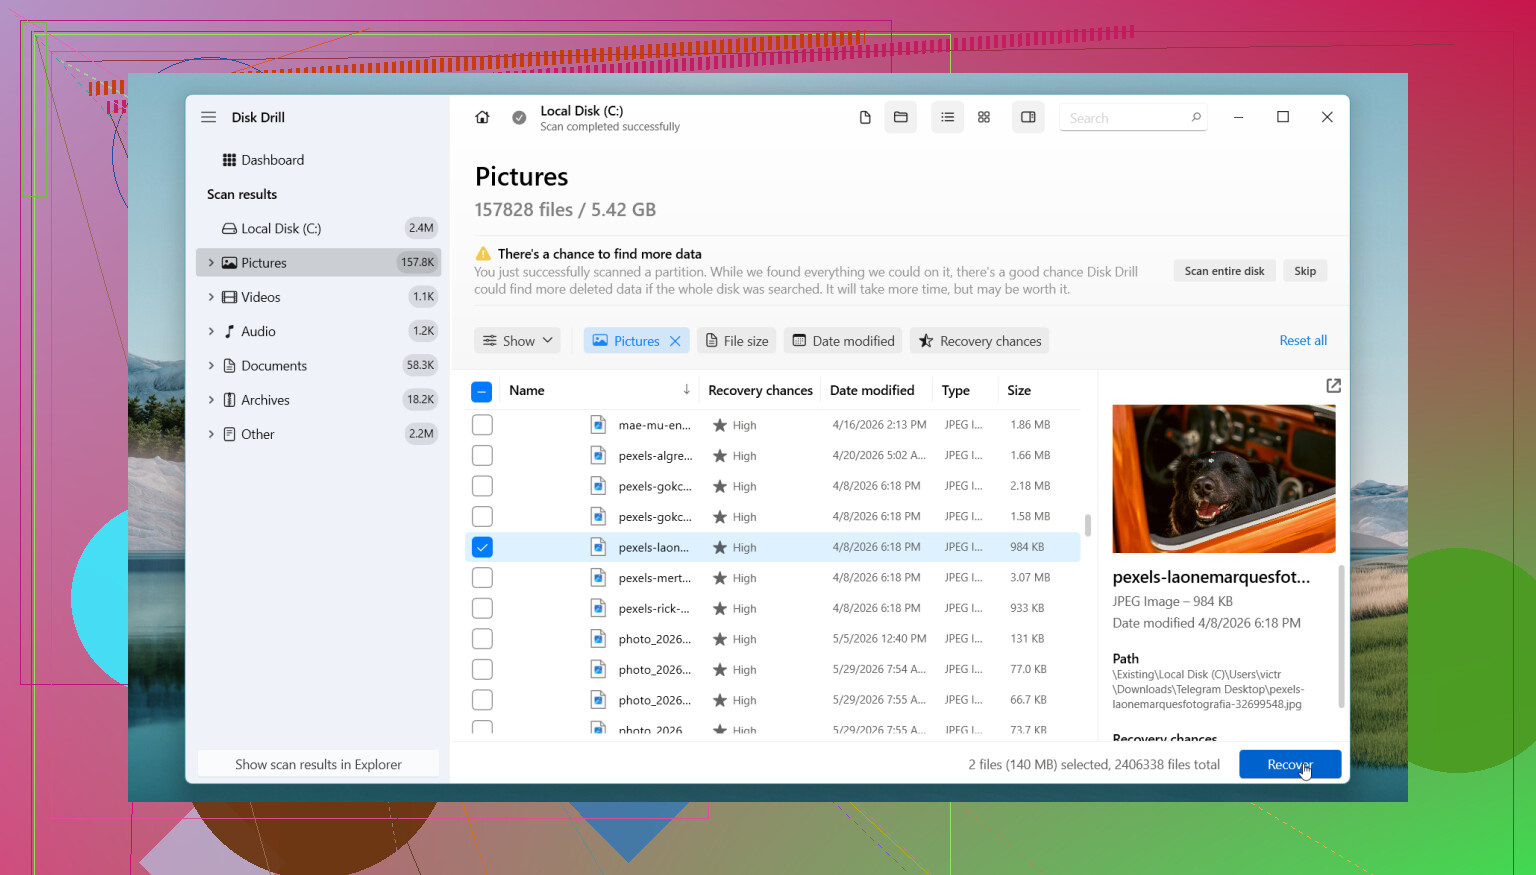
- Use search and filters to narrow things down.
- Preview files where preview works.
- Recover the files to another drive, not the same one.
The free Windows version gives unlimited scanning and preview, and it recovers up to 100 MB. For small docs or a few photos, that’s often enough to confirm whether the files are there before spending money.
If you want a free option, PhotoRec still does the job. I’ve used it too. It finds a lot, but the output is messy. You often lose the original filenames and folder layout, so you end up sorting through a pile of recovered files by hand. Good tool, rough experience.
There are cases where I wouldn’t keep pushing with software:
- The drive makes clicking, grinding, or other weird noises.
- Windows stops seeing the drive at all.
- The drive keeps disconnecting.
- The SSD or HDD looks physically damaged.
- The files matter enough where you don’t want to gamble.
- Recovery software comes up empty.
At that point, I’d stop. More DIY attempts sometimes make things worse, espeically with failing hardware. A recovery shop costs more, but if the data matters, waiting usually doesn’t help.
So yeah, check backups first. Then keep drive activity low and move fast. If the storage device is still healthy, your odds are usually a lot better than people think.
10 Likes
First thing, stop using the SSD. Don’t browse, install, copy, or update stuff on it. With SSDs, the big problem is TRIM. Once Windows tells the SSD those blocks are free, recovery rates drop fast.
I agree with @mikeappsreviewer on checking backup sources first. Where I differ a bit, I would not spend much time testing lots of tools on the same machine if the files matter. Every extra reboot and install is risk.
Best move for DIY is this:
- Shut the PC down.
- Connect the SSD to another Windows PC as a secondary drive, or boot from a USB recovery environment.
- Make a byte-for-byte image of the SSD first, if you have space. Use the image for scanning, not the original drive.
- Run recovery on the image.
That image step matters a lot. It gives you one clean shot. If a scan goes bad or you click the wrong thing, you still have the source. Ppl skip this and regret it.
For software, Disk Drill is a solid pick because it handles deleted file scans well and lets you preview results fast. If it shows original filenames and folder paths, your odds are better. Recover everything to a different drive. Never back to the same SSD, yeah, even if Windows nags you for space.
If Disk Drill finds only RAW files with generic names, TRIM likely already hit some data. Then sort by file type, date, and size. Focus on the most important stuff first.
Also, run this in Command Prompt on the affected drive only if you suspect file system damage, not simple deletion:
chkdsk X: /f
I know some people throw CHKDSK at every storage problem. I don’t. On deletion cases, it often does nothing useful and muddies things up a bit.
If you want a clear walkthrough, this Windows deleted file recovery guide for SSDs and PCs covers the process in a clean way.
If the files are business, legal, or family stuff you cannot replace, skip DIY after one scan attempt. Lab recovery costs more, but repeated home attempts cost data.
One thing I’d add to what @mikeappsreviewer and @nachtschatten said: check whether the deleted files were ever opened by an app that keeps its own temp/autosave copies. That sometimes works when actual file recovery doesn’t.
Examples:
- Word, Excel, PowerPoint: look for AutoRecover or unsaved docs
- Photoshop, Premiere, CAD apps: many keep recovery caches
- Notepad++ and some editors: session snapshots
- Browser downloads or email attachments: maybe still cached or sitting in Sent/Downloads elsewhere
Also, I slightly disagree with the “run CHKDSK if maybe file system damage” angle unless you already know there’s corruption. On a simple deletion case, CHKDSK is usually just extra poking at the drive. Not my fav move tbh.
Another overlooked Windows 11 option is Windows File Recovery from Microsoft. It’s command-line only and kinda ugly, but since it’s Microsoft’s own tool, some ppl prefer trying that before paid apps. For SSD recovery though, if you want something faster to sort through results, Disk Drill is usually way easier because previewing and filtering recovered files saves a ton of time.
If you do scan:
- search by exact extension first
- sort by original path if available
- recover only the must-have stuff first
- save recovered files to an external drive
And if the files were deleted from the system SSD, don’t keep booting into that same Windows install over and over. Every login writes junk in the background. Sneaky little writes add up.
If you want more focused reading, this thread has solid Windows 11 deleted file recovery tips and SSD recovery advice.
Short version: app autosaves, temp folders, and Windows File Recovery are worth checking before you assume the SSD ate everything for real.
One angle I don’t see stressed enough: check Windows Search index and app MRU lists before full recovery. Sounds weird, but if the files were recently opened, you can sometimes trace exact filenames and original locations from Recent Files, jump lists, Office recent docs, Adobe recent lists, or even thumbnail cache. That helps a lot when recovery tools return hundreds of similar files.
I’m with @nachtschatten, @ombrasilente, and @mikeappsreviewer on avoiding writes, but I’m less convinced that CHKDSK belongs anywhere near a plain deletion case. If the SSD is healthy and the problem is just “I deleted stuff,” I’d leave filesystem repair tools alone.
A couple of extra checks:
- OneDrive version history if the files were synced, not just its recycle bin
- Windows.old if this happened after an update/reset
- Email attachments you sent or received
- Cached exports from apps like Lightroom, Premiere, IDEs, etc.
- Network shares / NAS snapshots if the folder was redirected
About Disk Drill: good choice if you want fast triage.
Pros
- easy preview
- filters by type/date
- often preserves names/paths better than carving-only tools
- less painful than command-line options
Cons
- free recovery on Windows is limited
- SSD + TRIM can still mean little to recover
- deep scans can return lots of junk if metadata is gone
If you use it, I’d target only the file types and folders you care about first instead of recovering everything. On SSDs, the question is often not “which app is best?” but “did TRIM already zero your chance?” Disk Drill can answer that quickly, which is honestly valuable by itself.