I’m trying to create professional-looking AI headshots for my online profiles, but most results look obviously fake, over-airbrushed, or just not like me. I need advice on which tools, settings, or prompts can produce realistic, natural headshots that still look polished and professional. Any recommendations or examples that worked for you would really help.
Yes, AI headshots can pass as real photos
I’ve been messing with AI headshot tools for a while. For basic stuff like LinkedIn, company Slack profiles, websites, they are usually fine. If someone is not actively hunting for AI artifacts, they tend to scroll past and assume it was taken in a studio.
They are not magic though. You do not get 40 perfect shots. You get a batch, you keep 3 or 4, you delete the rest.
Here is one I generated with Eltima AI Headshot Generator
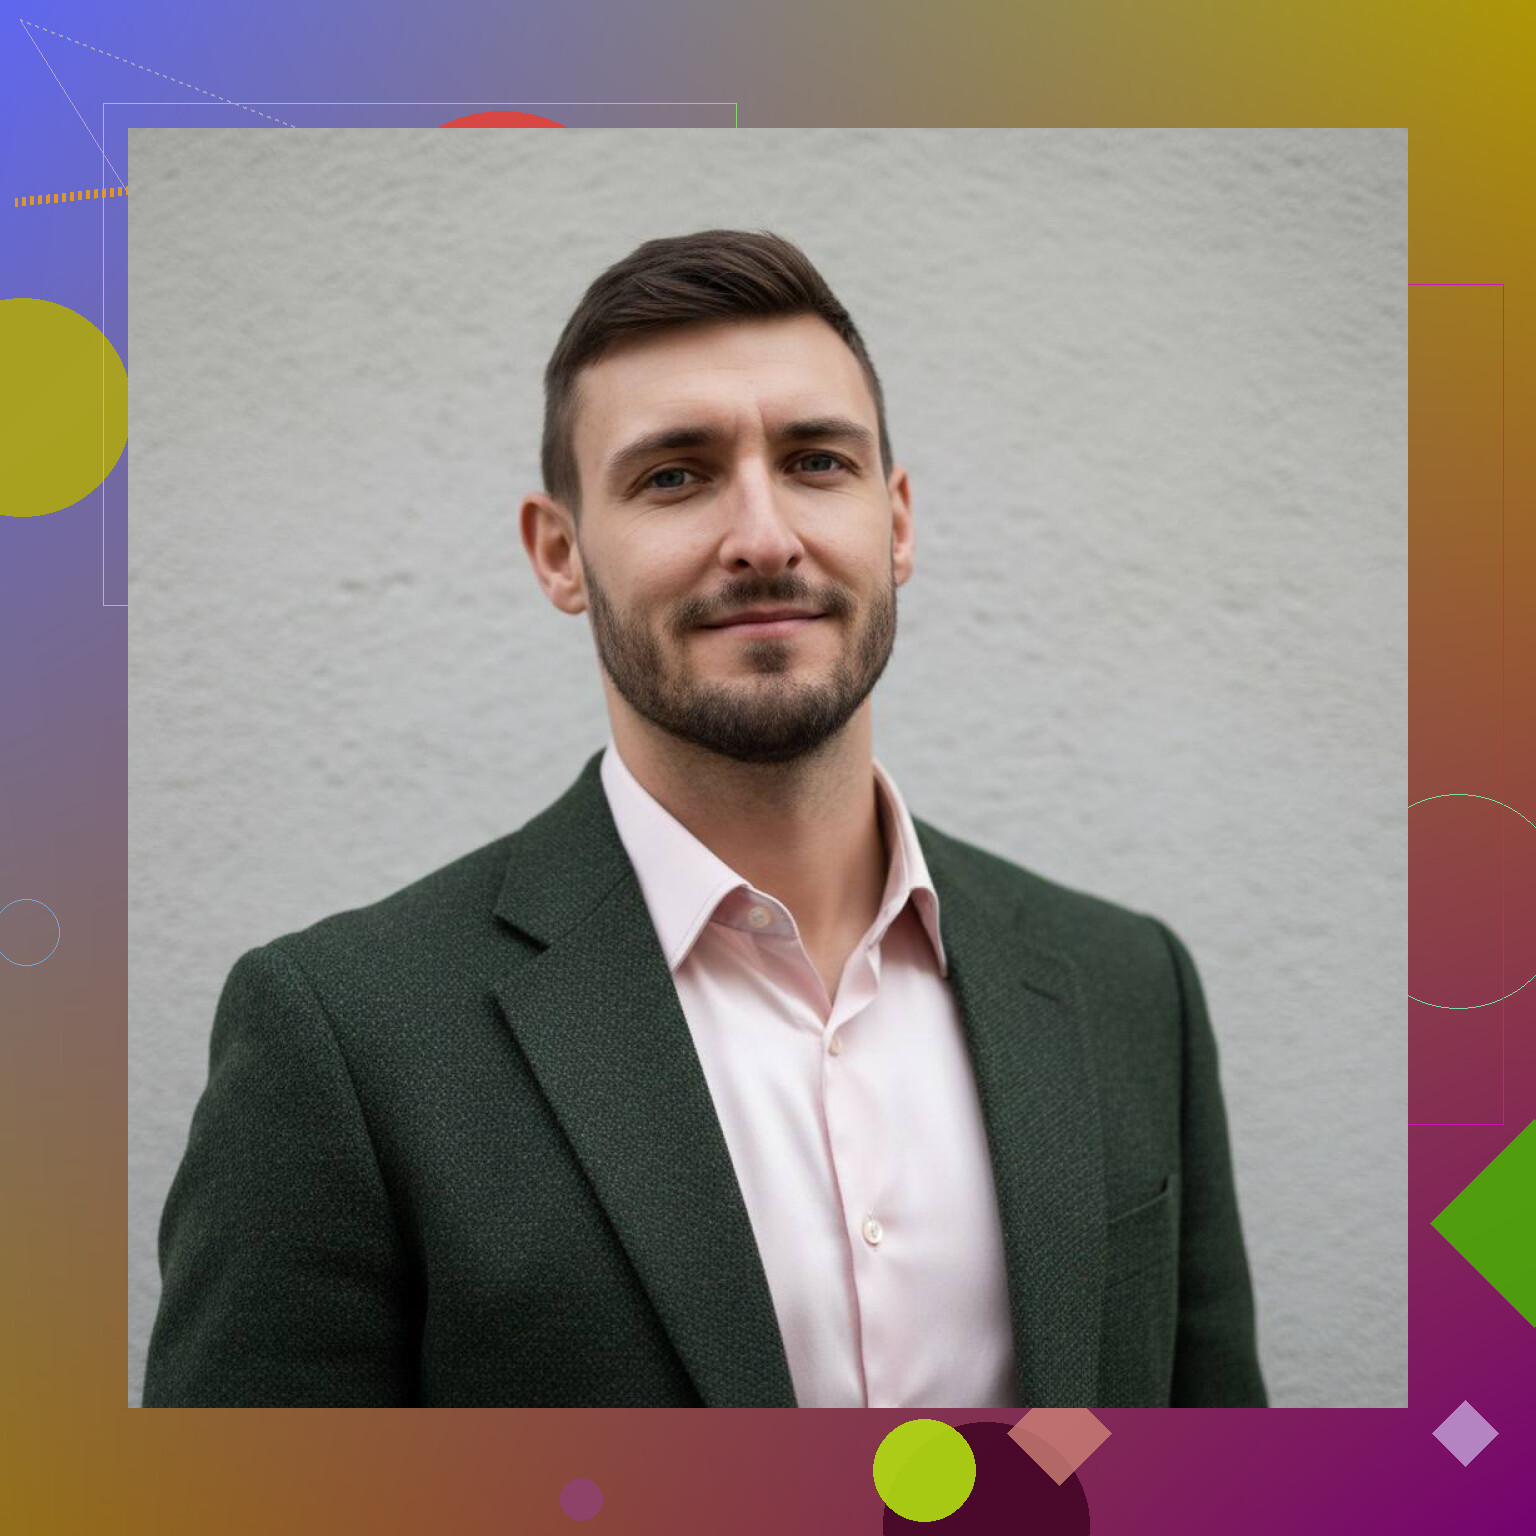

This was not from a camera. No photographer, no studio. It surprised me a bit when I saw the final version, because from a thumbnail it looks like something a corporate photographer would send after a session.
Why some AI headshots still look fake
From what I have seen, the failures usually fall into the same buckets:
• Skin looks like rubber or wax.
You get a “beauty filter x100” effect, pores vanish, texture disappears. It looks more like a game character than a person who walked outside.
• Lighting does not make sense.
You get weird shadows, highlights only on one side of the face, or reflections that do not line up with the supposed light source. On a quick glance it looks fine. On a second look the brain says “something is off”.
• Face looks like a cousin, not you.
The bone structure shifts a bit, eyes get reshaped, nose is slimmer, jawline is sharper. It still looks human, but your friends would say “that looks like you, but… no”.
• Bad input photos.
If the selfies you feed it have different hair styles, strong filters, or are blurry, the model struggles. It starts averaging everything and you end up with a face that belongs to no one.
The other problem is weak generators that only slap a “professional” filter on a selfie instead of learning your actual features. Those tend to give that generic LinkedIn-template face where everyone looks like a stock photo actor.
How I got more natural results
What helped me the most was treating it more like a short photo session than a random upload.
Here is what I did that worked:
-
Gave it multiple clear selfies
I took several photos in daylight, near a window, no harsh backlight. Front, slight angle, slight tilt, a few neutral expressions. Not model-level photos, just not trash. -
Avoided filters and heavy editing
No beauty filters, no HDR nonsense, no face smoothing. The more “honest” the photo, the better the model seems to learn your actual skin, eyes, and facial structure. -
Used a tool that trains on my face
There is a big difference between apps that overlay “headshot styles” on one selfie and ones that train a small model on several photos of you.
Tools like Eltima AI Headshot Generator do this training step:
It builds a representation of your face from the set of selfies, then generates new images based on that. In my runs, that led to:
• Fewer warped facial features
• More consistent jawline, nose, and eyes
• Less of that “default stock person” look
It still produced some weird ones, but the hit rate was clearly higher than the effect-only apps.
What I look for when picking the final images
Out of a batch, I usually do this:
• Check the eyes first
If the reflections, pupils, and gaze line up, the rest tends to be ok. If the eyes feel glassy or misaligned, I discard it.
• Look at ears and hair edges
This is where artifacts hide. If the ear shape is melted into the background or hair blends into the suit, it is obvious to anyone who stares more than two seconds.
• Zoom into skin texture
Slight smoothing is fine. Total plastic is not. I keep the ones where I still see some pores or at least natural variation, not a uniform blur.
• Make sure it still “reads” as me
I ask myself: if I used this on LinkedIn and walked into an interview, would the recruiter recognize me without any pause. If the answer is no, I skip it.
Tool choice matters more than people think
After testing a bunch of apps, I stopped bothering with the ones that:
• Only accept one selfie
• Do not mention any training or model building
• Only offer “filters” like “CEO look” or “corporate style”
The ones that learn from multiple photos seem to give more stable results.
What you should expect
If you go into this expecting one-tap perfection, it will feel disappointing.
If you go into it expecting:
• To shoot 1 to 3 decent selfies
• To try a tool that trains on your face
• To sort through a batch and pick 2 to 5 keepers
Then it starts to make sense. For LinkedIn, resumes, and profile pictures, those keepers tend to be “real enough” that nobody will call them out as AI unless they are hunting for it.
They exist. They work. The trick is in the input photos, the generator you pick, and being willing to delete most of the results without getting attached to them.
4 Likes
Short version. You need three things: better control, milder models, and more honesty about how you look.
Some extra angles on top of what @mikeappsreviewer said.
-
Pick tools with “subtle” or “low edit” modes
Look for options like:
• “Photo enhancement” instead of “AI avatar”
• “Retain likeness” or “low stylization”
• “Portrait upscaler” or “face restore”
Tools that start from your photo and clean it up often look more real than full generative headshot apps.Examples to test:
• Try a normal selfie, then run it through:- A face restoration model (like “GFPGAN”, “CodeFormer” in many web UIs)
- A portrait upscaler
- A light skin retouch plugin
You end up with your real face, with better lighting and small fixes, instead of a full AI redraw.
-
Control “prompt strength” and style strength
If you use something like Midjourney, DALL·E, Stable Diffusion:
• Keep style prompts simple: “professional corporate headshot, neutral lighting, realistic skin texture, no makeup effect”
• Avoid words like “perfect”, “flawless”, “beauty”, “model”, “glamour”
Those push the model to plastic skin and sharper jawlines.If the tool has a “strength” or “image weight” slider:
• Set your photo strength high (0.7–0.9) so it stays you
• Set text/style strength lower so it does not overwrite your face -
Calibrate your “realism”
A lot of people reject the good images because they look less flattering than the fake ones.
Run a quick check:
• Compare your favorite AI output to a selfie you took last week
• If the jaw, nose, or eye size changed a lot, throw it out even if it looks nicer
Your future recruiter sees your real face, not the AI face. -
Use boring lighting and backgrounds
To avoid “this looks AI” reactions:
• Ask for “flat soft lighting, studio key light, no dramatic shadows”
• Ask for “simple blurred gray or light office background”
• Avoid bokeh fireworks, sunset rim light, neon, etc.
Boring looks real for headshots. -
Force skin texture
Prompts and settings that help:
• Add phrases like “visible skin texture, light pores, natural wrinkles, subtle under eye texture”
• Avoid “smooth skin”, “airbrushed”, “porcelain”
• If your tool lets you pick a model, choose one tagged as “photorealistic” or “documentary” not “beauty” or “glamour”. -
Fix small issues after, not in the prompt
Treat AI output like a near-final photo:
• Use a basic editor to reduce sharpening, reduce contrast, or add a tiny bit of grain
• Grain hides AI artifacts and makes skin less plastic
• If the eyes look too bright or too white, darken them a bit
These tiny edits pull the image back toward a normal photo. -
Give it one “anchor” photo
Besides multiple selfies, pick one photo that is closest to how you look at work today.
Use that as the main reference and tell the tool:
“Keep face structure identical to the input photo. Only change lighting, clothes, and background.”
If the service does not let you specify that level of control, you will keep fighting the “cousin, not you” effect. -
Practical workflow that stays realistic
If you have no interest in full AI art setups, try this path:
• Take 10 selfies in window light, plain wall, neutral expression
• Pick the sharpest 2 or 3
• Run them through:- One “AI headshot” generator that trains on your face
- One “photo enhancer” that only cleans and retouches
• Compare. Use the ones that look closest to your raw photos, not the most glamorous ones.
Last thing. If you have to ask “does this look AI” then err on the side of more natural. Slightly boring, slightly imperfect, but recognizably you beats the polished plastic look every time.
Short version: stop asking the AI to be your glam squad and start treating it like a mediocre photographer you have to supervise.
Couple points that slightly disagree with @mikeappsreviewer and @sognonotturno:
-
Don’t always use a “training” app
Apps that train on 10–20 of your photos can be great, but they also tend to average your face into one “idealized you.” If you already have one or two solid selfies, a light-edit tool can actually be more realistic than a full generator.
Try a pipeline like:- Your real selfie
- Mild retouch / lighting fix
- Optional background change
No full redraw. Less impressive, more believable.
-
Shoot one deliberate real photo first
People overthink prompts and underthink the base photo. Spend 15 minutes on this:- Plain background (blank wall, curtain, whatever)
- Window light from the side, not overhead
- Phone at eye level, rear camera if possible
Get one sharp, neutral, boring photo. That’s gold for realistic AI edits.
-
Use AI mostly to fix 3 things, not 30
Instead of “make a professional headshot,” phrase it like:- “Same face and proportions, improve lighting and sharpness, keep skin texture, very light retouch, change background to simple blurred office”
The more tasks you give it, the more it hallucinates a new person.
- “Same face and proportions, improve lighting and sharpness, keep skin texture, very light retouch, change background to simple blurred office”
-
Add imperfections on purpose
This is where most tools screw it up. After generating, quickly check:- Do the under-eye areas look too bright or flat? Lower brightness locally.
- Is the skin completely smooth? Add a tiny bit of grain or noise.
- Teeth glowing? Tone them down.
That 2 minutes of “de-prettifying” helps it read like a real camera shot.
-
Avoid the “AI look” by skipping trendy cues
In prompts / settings, stay away from:- “Cinematic”
- “Ultra detailed 8k”
- “Studio glamour”
- Dramatic rim lighting / colored lights
That stuff screams generated. Ask for “standard studio lighting, neutral background, realistic color” instead.
-
Keep clothing boring and current
A lot of AI headshots look fake not because of the face but the outfit.- Avoid perfectly tailored suits if you don’t dress like that
- Avoid weird lapels, random pins, or “luxury” fabrics
- Ask explicitly for “simple business casual shirt in solid color, no jewelry change, no new hairstyle”
The second the clothes look stock-photo-perfect, people subconsciously clock it as fake.
-
Reality check with someone who knows your face
Before you post, do one brutal test:- Show 3 candidates to a friend and ask:
“If you were meeting this person off LinkedIn, would you expect to see exactly my face or would you be slightly surprised?”
If they hesitate, trash it, even if it’s flattering.
- Show 3 candidates to a friend and ask:
-
If you can, mix AI + 1 real photo on your profiles
This is optional but helpful. Use:- AI headshot for LinkedIn banner / “polished” places
- One normal but decent selfie somewhere else public
That way if people suspect the headshot is AI, they can still see a real you nearby and won’t feel bait-and-switched.
So: one intentional real photo, AI as a subtle assistant, not a full painter, and a bit of manual “messing it back up” afterward. The stuff you end up keeping will look way more like “you had a short studio session” and less like “you joined an AI influencer cult.”
Quick add-on from a more “no-nonsense” angle, trying not to repeat what’s already been covered.
1. Decide: edit reality or fabricate a studio shoot
Everyone above treats AI like a cautious retoucher, which is smart. I’d go more extreme:
- If you want “this is me, just tidier,” stick to photo-first tools: basic portrait editors, background replacers, light skin retouch. No avatars, no “model training.”
- If you want “I never booked a photographer but it looks like I did,” then a model-training tool like Eltima AI Headshot Generator actually makes sense.
Mixing those two goals in one tool is why people get plastic faces.
2. When a training app like Eltima AI Headshot Generator actually makes sense
Eltima AI Headshot Generator shines when:
Pros
- You need multiple consistent shots (website team page, internal directory, etc.).
- Your raw selfies are mediocre in lighting and framing.
- You can supply at least 1 to 3 unfiltered close-ups.
Cons
- It will drift toward a slightly idealized “you,” especially if your input photos vary a lot.
- You still have to throw away a chunk of outputs.
- It is slower and more involved than a simple background-removal app.
This is exactly where I disagree a bit with the very “light touch only” approach: if you need a set of matching portraits, a mild training-based app is sometimes more believable than trying to hand-edit each selfie into the same style.
3. Use different tools for different problems
Instead of hunting for a single magic app:
- For likeness: training-based generator (Eltima AI Headshot Generator, or similar style tools that build a face model).
- For small fixes: any standard photo editor with:
- slight grain
- small clarity/sharpness tweaks
- local darkening of eyes/teeth if they look too perfect
- For background / crop: even basic phone editors or browser tools.
You are basically doing what a human retoucher does, just delegating the heavy lifting.
4. Where I slightly disagree with the others
- You do not always need 10+ selfies. If you already have one well lit, sharp, front-facing shot, a careful edit can beat a full generator that averages away your quirks.
- Hyper-honesty about every wrinkle is overrated for LinkedIn. The line I use: “Would a person be surprised or feel misled in real life?” If not, a bit of flattering softening is fine.
@viaggiatoresolare leans harder into “AI as a micro-retoucher,” @sognonotturno into realism prompts, @mikeappsreviewer into model choice and workflow. All valid. The missing angle is tool specialization: use training apps only when you actually need new photos, not as a default filter.
If you keep that separation clear, the “obviously fake” look drops off a lot, even before you start getting fancy with prompts or settings.