I accidentally deleted a folder with important work and personal files on my Windows PC and only realized after emptying the Recycle Bin. I’m trying to decide between using Disk Drill or Recuva to get them back. Which tool has worked better for you in terms of success rate, safety, and ease of use, especially for deep scans on a nearly full drive? Any tips or mistakes to avoid while running recovery would really help.
Alright, here is how it went for me with Disk Drill, written out once so I can stop typing fragments of this in every other thread.
I do photo and video on the side. Not full-time, but enough that I shuffle media between SD cards, SSDs, spinning rust, and two main machines. Stuff gets yanked out mid-transfer, cards throw file system errors, Windows decides a working drive needs to be “repaired.” Half my mistakes, half random bad luck.
Over a few years I tried a pile of recovery tools. One of them even wrote data onto the same dying drive it was “recovering” from. That was the day I started reading way more before trusting any tool.
A friend who does IT for small businesses sent me this link and told me to stop experimenting and install Disk Drill:
https://www.reddit.com/r/DataRecoveryHelp/comments/1qi1apk/disk_drill_review/
I did. Been on it since.
Disk Drill and the “panic to results” gap
The thing I noticed first was not performance or features. It was how fast I went from “oh, I’m screwed” to “ok, I see my files.”
Every other recovery program I tried made me pick modes. Quick scan, deep scan, raw scan, different algorithms, a forest of checkboxes. If you guess wrong, you waste time or miss files.
With Disk Drill I select a drive, hit scan, and leave it alone. Behind the scenes it runs multiple methods in one go, but I never touch any of that. It starts showing results while the scan is still running, and I can start recovering before it finishes.
I’ve put it on machines for people who call Excel “that green icon” and they got their stuff back without me screen-sharing or walking them through a checklist. That matters when you get a text at midnight that says “I deleted everything help.”
How the scans behaved for me
Let me be blunt. I do not sit around timing scans with a stopwatch. I only noted things when I was stressed and waiting.
Here is what I saw on my setup:
• 32 GB SD card from a Sony mirrorless
Scan time was around 2–3 minutes over a USB 3 reader. I saw RAWs popping up almost immediately, and I pulled what I needed before it finished.
• 500 GB USB external HDD
USB 3 again. Roughly 15–20 minutes depending on how fragmented the thing was. I could already preview photos and small videos after a few minutes.
• 1 TB internal SSD
Took longer, but the useful part is I was going through folder trees and checking previews while the progress bar kept moving. I did not have to babysit it.
Some other tools I tried would do nothing until the scan completed. No tree, no file list, no previews. If the scan failed at 95 percent, you got nothing. That got old fast.
When I had a client pinging me every 5 minutes asking where their gallery was, being able to cherry pick only the critical RAWs mid-scan helped a lot. I recovered a handful of shots, edited them, sent proof, then went back for the rest later.
File type support that did not fall apart with RAW
Every data recovery vendor loves to write “supports hundreds of file types” on the homepage. The difference shows up on weird formats or pro formats.
I shoot RAW. Here is what I personally tested on damaged or formatted cards:
• Canon CR2 and CR3
• Sony ARW
• Nikon NEF
• Olympus ORF
• Panasonic RW2
• DNG
• Fujifilm RAF
Disk Drill treated them like actual photo formats, not random binary chunks. Recovered files opened in Lightroom and Capture One without glitchy previews or half-gray frames. I checked recovered CR3 and ARW files against backups and they matched as far as I could tell.
I also threw these at it:
• H.264 and H.265 video clips from mirrorless cameras
• GoPro and DJI MP4/MOV
• ProRes from a small production job
• R3D test clips from a friend’s RED
• Office docs, PDFs, ZIPs, some SQLite database files
Most of that worked fine. I do not use Maya or niche CAD formats in real projects, but I saw those listed in its supported signatures. The point is, whoever built the scanner did not stop after “JPG and DOCX.”
One Saturday night, one RAW SD card, and one panicked wedding shooter
This is the one I reference the most when people ask if Disk Drill is “worth it.”
A friend of mine shoots weddings. Two cameras, two 64 GB SD cards, one whole day. She got home, put the first card in a cheap USB reader, and her PC froze solid mid-copy.
After the reboot, Windows showed that SD card as RAW. No volume label, no folders, nothing to open. You know that drop in your stomach when the OS prompts you to format the card.
She called me. Almost crying. I grabbed my laptop, a proper card reader, and drove over.
Step by step what we did:
- Installed Disk Drill on my laptop, not the card.
- Slotted the SD card into a USB 3 reader.
- Selected the card in Disk Drill and started a full scan. No extra configuration.
- Waited around four minutes.
The scan found more than 800 RAW files and about 400 JPEGs. All with previews. We clicked through samples from different times during the day, from ceremony to reception.
Recovery took maybe another two or three minutes to a separate external SSD. Next morning she opened everything in Lightroom. No corrupt frames, no half files.
She bought her own Disk Drill license after that and left a bottle of wine at my door.
Why the preview system saved me hours
On big drives, recovery results look like a junk drawer. There are thousands of things, many with generic names. Some are old, some new, some half-overwritten.
If you have no preview, you end up recovering giant chunks, then sorting later. I did that with one of the older utilities and burned a whole afternoon sifting through trash.
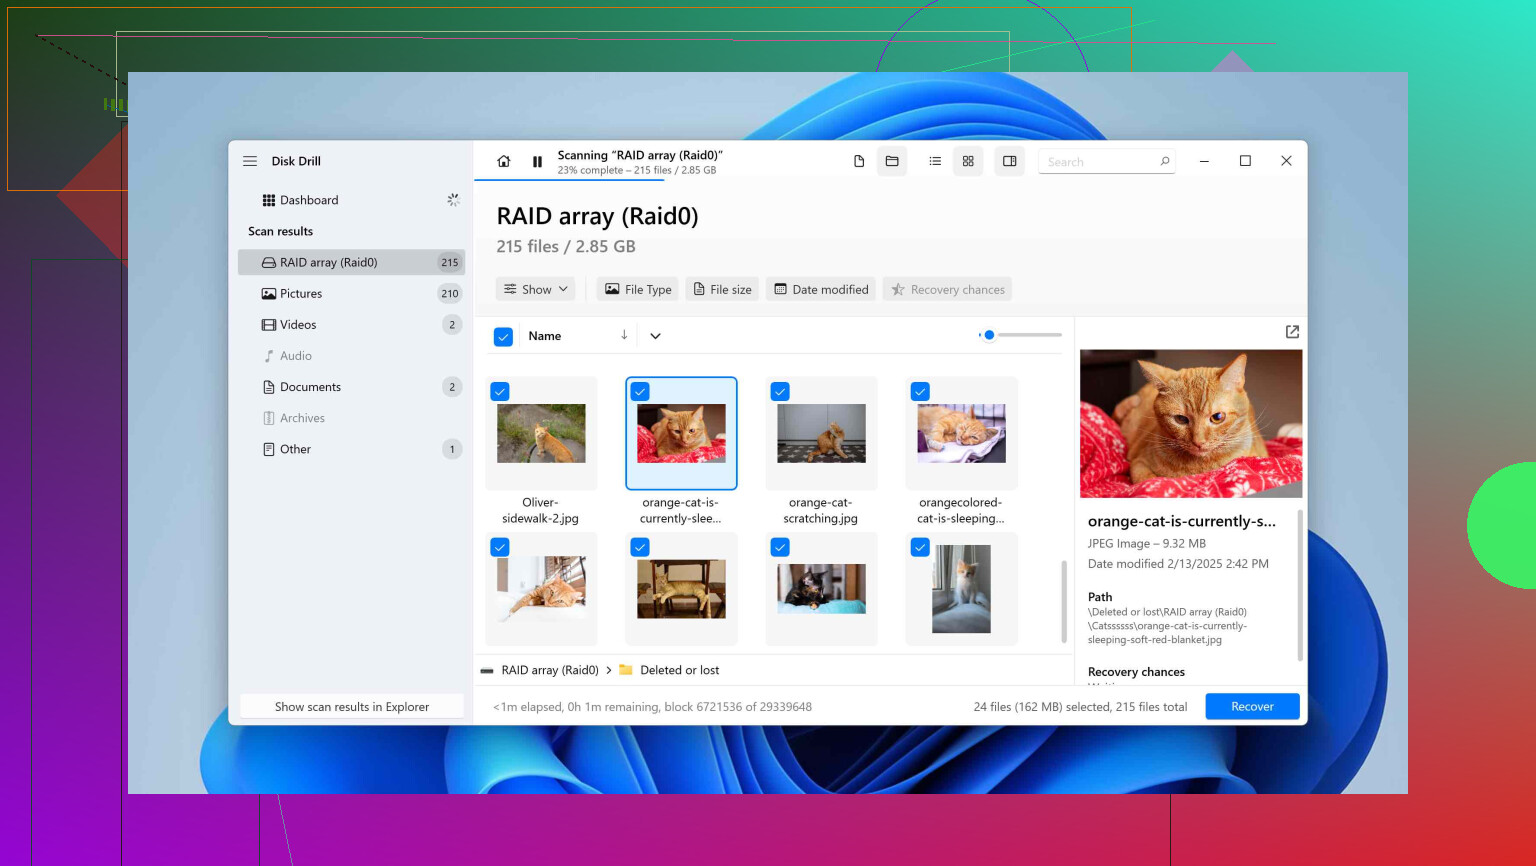
Disk Drill shows:
• Preview for images, videos, docs, PDFs, some audio
• Original folder paths where possible
• A simple “recovery chances” status on every file: high, average, low
For one dying external HDD, I filtered by file type, sorted by chance of recovery, and spot-checked previews. Anything showing blocky artifacts or failed preview I ignored. I focused only on high-chance files with correct previews, which cut the recovery workload enough that I got the important stuff off before the drive worsened.
This preview system made the difference between “random grab bag of files” and “selective, targeted rescue.”
Video from action cams and drones, where most tools fail
Anyone who has tried to recover videos from GoPros or drones knows this pain: the tool claims it recovered the clips, but they refuse to play or stop after a few seconds.
A lot of cameras do not write video as one clean block. They fragment the file over the card. Once the file system breaks, miscellaneous recovery tools grab whatever chunks they see in random order. The result is broken video, partial length, or nothing.
Disk Drill has an Advanced Camera Recovery mode. I was initially skeptical because it sounded like marketing. So I tested it on a damaged DJI card.
The card:
• 128 GB microSD from a DJI drone
• About 6 hours of mixed flight footage
• File system corrupted after pulling the card while the drone was still finalizing a file (my fault)
On other tools, I got:
• A list of .MP4 files by signature only
• Maybe 2 out of 12 files played fully
• A bunch would not open at all or would hang media players
On Disk Drill with ACR:
• It identified clips by camera model
• Rebuilt each file, not just by extension
• Every single clip I needed played fully, with proper lengths
I watched them back to back. No jumps, no black segments. That was the moment I moved this from “nice to have” to “core tool.”
The list of supported gear is not exhaustive, but I have personally used it on:
• GoPro
• DJI drones
• Sony mirrorless
• Canon bodies with video
• Insta360
If you get paid for video or you fly drones for clients, this mode alone paid for my license after one save.
How I handled a dying 2 TB external
Different story. This one involved a mechanical external HDD that started clicking once in a while. Not nonstop, but enough to scare me.
My first instinct was to scan it right away. That would have been a mistake. Repeated reads on a physically failing drive speed up the death spiral.
Disk Drill has something called byte-to-byte backup. It creates a full sector-level image of a drive into a file. That is what you work on instead of the original.
What I did:
- Plugged the failing 2 TB USB HDD into my desktop.
- Opened Disk Drill and started a byte-to-byte backup to a healthy 4 TB drive.
- It showed a visual map of sectors: good, slow, and bad.
- On the first pass it skipped the unreadable spots to grab the healthy data faster.
- Then it circled back and retried the weak sectors with smaller read sizes.
That process ran on and off while I did other stuff. You can pause and resume. When it finished, I had an image file representing the whole disk.
From then on, I:
• Unplugged the original HDD and put it in a drawer.
• Mounted the image in Disk Drill.
• Ran all recovery scans on the image instead of the physical drive.
Recovered data: around 1.8 TB worth of files that opened fine.
The original HDD stopped spinning entirely a few weeks later. If I had tried random scans repeatedly before imaging it, I doubt I would have gotten that much out.
Drive health monitoring that quietly saved me twice
Disk Drill reads S.M.A.R.T. data from drives. That includes:
• Reallocated sector counts
• Pending sectors
• Temperature
• Power-on hours
• Some vendor-specific warning flags
It is not as full-featured as dedicated monitoring tools, but it is good enough to spot drives that are starting to go bad.
Two separate times, I saw rising reallocated sector counts on older spinning drives while checking something else in Disk Drill. Both drives were still “usable” from the OS perspective. I copied everything off them that week and retired them.
If I had waited until clicks or slow reads, I would have needed recovery again. Catching issues before failure is the best “data recovery” you will ever do.
That weird Recovery Vault thing
Most people skip it because it sounds like marketing garnish. I switched it on out of curiosity and then sort of forgot about it until it helped me with something small, then I kept it active.
What it does:
• Lets you protect specific drives or folders
• Logs metadata about deleted files from those locations
• Does not duplicate the actual file content
When you delete a file from a protected folder and later regret it, Disk Drill has extra info about the original name, location, and some structure. This raises the success rate and keeps the original file names intact after recovery.
I run it on:
• My main photo and video project folders
• My desktop, where I temporarily park working files
It is not a backup. You still need backups. But for accidental deletes on active work folders, it made life easier.
One license, two OSes, same project
My daily setup:
• Windows workstation with lots of storage
• MacBook I lug to shoots and client locations
Disk Drill gives both Windows and macOS versions under one license, with nearly identical interfaces.
The part that surprised me was session portability. You can:
• Start a scan on Windows
• Save the scan session
• Move it to a Mac
• Open the session and continue browsing results or recovering
I started a long scan of a 4 TB HDD on my desktop, had to leave, saved the session, copied it to my MacBook, and finished recovering from the couch later. No rescan needed.
I have not seen many recovery tools that treat cross-platform usage like a first-class feature. For a mixed-OS workflow, it helps a lot.
Oddball file systems that did not trip it up
Plain NTFS, FAT32, and exFAT are nothing special anymore. The interesting tests were these:
• HFS and HFS+ from an older Mac external
• APFS for my newer Mac volumes
• EXT4 from a Linux-formatted USB
• One BTRFS volume from a NAS experiment
• A RAW disk Windows wanted to format
The Linux USB case was funny. Coworker handed me the stick with “everything important” from an old server, plugged it into my Windows PC, and Windows suggested formatting it. I ignored that, opened Disk Drill, and it saw EXT4, scanned it, and listed the whole file structure. That avoided spinning up a separate Linux rescue environment.
I still use native tools on Linux boxes when needed, but for quick jobs on a Windows machine, this saved me some hassle.
RAID stuff I do not even use, but tested for someone else
I do not run RAID at home beyond simple mirrors, so my experience is limited. That said, I helped someone with a Windows Storage Spaces mess and poked around with Disk Drill’s RAID tools.
It supports reconstructing various software RAID layouts:
• RAID 0, 1, 5, 6, 10, 1E
• JBOD
• Windows Storage Spaces pools
I fed it two member drives from a broken Storage Spaces setup. It recognized the structure, rebuilt the virtual volume, and let us scan that. We pulled the person’s project files and moved them onto a straightforward single drive with proper backups afterward.
I would still tell people with serious RAID problems to get a proper data recovery lab involved if there is big money on the line, but for smaller software arrays it is not useless fluff.
What it has done for me, across multiple screwups
Across the last few years I used Disk Drill on:
• Corrupted SD cards from Canon and Sony cameras
• Formatted SD card that I overwrote a bit before I noticed
• One failing 2 TB external HDD, physical issues
• USB flash drives pulled out mid-write
• A small NAS volume that lost its file system after a power cut
• An SSD I accidentally repartitioned
Results:
• SD cards: recovered the paid work I needed. I lost some old personal tests, which I could live with.
• Failing HDD: about 1.8 TB recovered, all important data opened fine.
• USB drives: mostly full recovery.
• NAS volume: enough to rebuild the share structure and rescue the work folders.
• SSD repartition: found older stuff and recent projects. Some old junk was gone, but the important working files survived.
The interface never buried me in cryptic settings. Scans did not feel endless because I could preview and recover while they were running. The advanced camera stuff delivered working drone footage where three other tools did not.
If you are still deciding, this is what I would do in your place:
- Install Disk Drill without writing anything to the damaged drive or card.
- Run a scan on the affected media.
- Do not pay yet.
- Look at the tree, filters, and previews.
- Check whether the specific files you care about show up, with working previews, and what their “chance” rating is.
If it finds what you need and the previews look clean, buying a license made sense for me. If it does not, at least you did not spend money to be disappointed.
That is been my actual day-to-day experience with it, across a bunch of dumb mistakes and random hardware issues.
8 Likes
Short version. For your deleted folder on Windows, Disk Drill is the better bet than Recuva in 2026.
Here is why, without repeating what @mikeappsreviewer already went through.
- Your exact situation
• Deleted folder.
• Emptied Recycle Bin.
• Internal Windows drive.
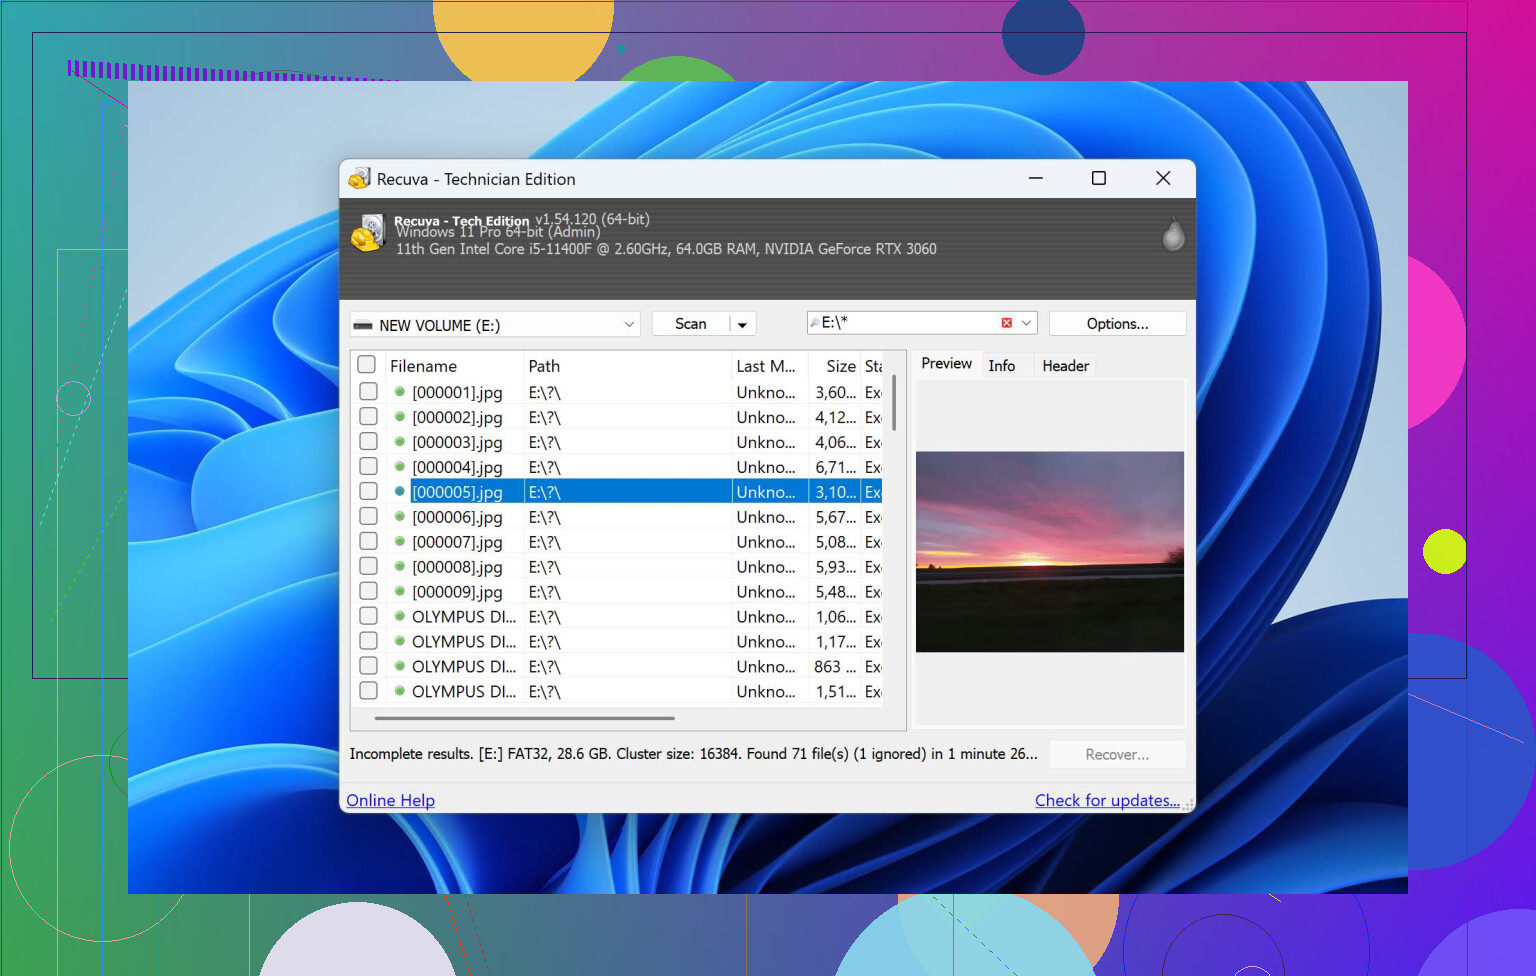
Recuva is decent for simple, recent deletes on healthy drives. It shines when:
• The file system is fine.
• Files are small.
• You do not care much about folder structure or previews.
Disk Drill is stronger when:
• You need to see folder structure.
• You want solid previews for many file types.
• You want better odds on partially overwritten data.
For a mixed “work and personal” folder, you likely care about structure and reliable previews. Disk Drill fits that better.
- Where I disagree a bit with the hype
I like Disk Drill, but it is not magic.
• If you have been writing a lot of new data to that same drive since the delete, some files are gone for good, no software fixes that.
• Deep scans on big SSDs do take time. You will wait. It is not instant.
So expectations:
• You often get a high recovery rate for recent deletes.
• Older stuff on an SSD is hit or miss because of TRIM.
- Disk Drill vs Recuva, practical differences
Recuva pros
• Free.
• Super small install.
• Good for quick undelete on external USB drives or simple cases.
Recuva cons
• Interface feels dated.
• Weaker on a large mix of file types.
• Raw scans are messy, lots of generic names.
• Development has slowed, so support for newer formats is limited.
Disk Drill pros
• Unified scan, you pick the drive, start scan, let it run.
• Strong previews for photos, docs, PDFs, many others.
• Shows original paths when possible, so whole folders are easier to rebuild.
• Byte to byte disk image feature helps if your drive starts to misbehave.
• Better for bigger jobs and mixed content.
Disk Drill cons
• Paid for recovery over a small free limit.
• Heavier install than Recuva.
- Exact steps I would take in your place
Important first
• Stop writing new data to that drive. No installs, no big downloads, no video editing.
• Install recovery software on a different drive than the one you deleted from.
If you pick Recuva
- Install to another drive or partition.
- Run a normal scan on the affected drive.
- Sort results by path and date.
- Recover to an external drive, not back to the same one.
- If the normal scan finds little, try deep scan, but expect a mess of file names.
If you pick Disk Drill
- Install Disk Drill on a different internal drive or external SSD.
- Start a full scan on the problem drive.
- While it scans, filter by file types you care about.
- Check previews of key files. If they open in preview, your odds are good.
- Recover only to another drive.
- If the drive behaves oddly or SMART looks bad, use byte to byte backup first, then scan the image.
- Concrete recommendation
For a one time serious incident with important files, Disk Drill is the better choice than Recuva.
Use Recuva only if:
• You refuse to pay.
• The files are “nice to have” but not critical.
If your work files matter for your job or personal data is important, Disk Drill is worth it.
- Quick explainer on data recovery, so your expectations stay sane
When you delete files and empty the Recycle Bin on Windows, the system does not instantly wipe all content. It marks the space as free. Data recovery software tries to read that “free” space before new data overwrites it. The success rate depends on:
• How long ago you deleted the files.
• How much new data you wrote after the delete.
• The type of drive, HDD or SSD.
• File system health and any hardware issues.
If you want a clear guide on how this works and what to expect, this is solid:
how data recovery works and what you should expect
For your case, stop using the drive, install Disk Drill on another disk, run a full scan, and check previews before paying. If you see your folder structure and files with clean previews, you are in good shape.
Short version: in your specific situation (folder deleted, Recycle Bin emptied, important mix of work + personal files on an internal Windows drive), I’d go with Disk Drill over Recuva and treat Recuva as a “nice if it works, whatever if it doesn’t” second opinion.
@mikeappsreviewer and @techchizkid already nailed most of the “how” so I won’t repeat their step‑by‑step. I’ll just add a few angles they didn’t lean on as much and push back in a couple of places.
1. What really matters for your case
The big factors here:
- Internal system drive (very likely SSD)
- Folder-level recovery needed (not just a few random files)
- Mix of file types (docs, photos, maybe archives, etc.)
- You already emptied the Recycle Bin
Where they’re both fine:
- Simple, very recent deletes on a healthy HDD with little activity
Where things diverge for your scenario:
-
Folder structure & metadata
Recuva can technically list paths, but on deeper scans it turns into a pile of “lostfile123.docx” style chaos. Disk Drill typically preserves folder hierarchy and original names more often in non-trivial cases. For rebuilding a deleted folder instead of one or two files, that’s a big deal. -
Previews that actually save you time
Recuva has previews, but they’re basic and hit-or-miss for anything beyond images. Disk Drill’s preview system is more mature and, more importantly, integrated into how you triage thousands of results. That’s where I side with @mikeappsreviewer: scrolling, filtering, previewing and then picking is way faster than blind mass recovery.
2. The part where I slightly disagree with the hype
Both folks made Disk Drill sound close to a “just install and it’ll save you” button. It’s good software, but a couple of reality checks:
-
SSD & TRIM are your biggest enemies, not your choice of app
If this is on a TRIM-enabled SSD and you’ve kept using the PC since the delete (especially installing stuff, big game updates, video editing, etc.), then some of that space is probably already wiped at the hardware level.
No software, not Disk Drill, not Recuva, not “military data recovery,” gets those bits back. -
Disk Drill is not always faster
Deep scans on large SSDs or HDDs do take time. Both tools will make you wait. The real quality-of-life is that Disk Drill lets you start evaluating and recovering while the scan is still ongoing.
So: Disk Drill is the better tool, but it is not a miracle. If TRIM already nuked those sectors, you’re done.
3. When Recuva is worth trying first anyway
Despite all that, I sometimes still run Recuva first in two situations:
-
You absolutely will not spend money
If paying for Disk Drill is off the table, Recuva is a zero-cost lottery ticket. Install it on a different drive, run a scan, see what it finds. If it hands you back 100 percent of what you care about, awesome, you’re done. -
The delete just happened & you caught it fast
Right-after-delete, no big writes, on an HDD or even an SSD that hasn’t been hammered yet. In those rare ideal cases, Recuva often does fine.
In your case, since you’re asking and sound concerned about “important” files, I wouldn’t rely on Recuva alone. At most, use it as a quick first pass before going to Disk Drill.
4. How I’d actually proceed in your shoes (strategy-level, not step-by-step)
Stuff I’d do differently from what most people instinctively do:
-
Stop touching that drive
Don’t install anything new to it, don’t run cleanup tools, don’t defrag, don’t even download huge files there. Every write is a chance to overwrite your deleted data. -
Install Disk Drill on a different drive
That could be:- Another internal drive or partition
- External SSD / HDD
Writing the program itself onto the affected volume is exactly how people accidentally destroy recoverable data.
-
Let Disk Drill show you what’s actually recoverable before paying
This part often gets skipped. Disk Drill will:- Show tree / folder structure it can reconstruct
- Show previews of office docs, PDFs, photos, etc.
- Flag files with “high / average / low” chance
Don’t pull out your card until you actually see the files and confirm previews of some critical ones look solid.
If Disk Drill’s full scan doesn’t show the key stuff with decent previews, there’s no reason to buy a license. That’s one place I think people oversell it: sometimes it simply can’t help, and you should walk away instead of throwing money and time at it.
5. When Recuva is not worth your time
I’d skip Recuva entirely if:
-
The deleted folder held a mix of:
- complex Office docs
- project directories (code, design, video projects, etc.)
- archives (ZIP/RAR) that you really need intact
-
The drive has any hint of weird behavior:
- Sluggish reads
- S.M.A.R.T. warnings
- Occasional freezes when accessing it
Recuva has nothing like Disk Drill’s byte-to-byte image workflow that @mikeappsreviewer described. Once a drive starts flaking out, playing with “quick free apps” instead of imaging first is how people turn a salvageable drive into a coaster.
6. If this freaked you out enough to plan ahead
You’re clearly in the “this would actually hurt if I lost it” zone. For the next time:
- Use Disk Drill’s Recovery Vault or similar features on the folders you constantly work out of. It’s not a backup, but it greatly improves odds on accidental deletes.
- Then, more importantly, set up:
- A real backup (local external drive)
- Plus at least one offsite / cloud sync for the truly critical personal and work stuff
Recovery software is last-resort. Backups are boring and not dramatic, but they’re what keeps you from needing any of this at 2 AM.
7. If Recuva just isn’t cutting it
If you try Recuva first and it either:
- Finds almost nothing
- Or finds a giant junk pile with broken or unopenable files
then you’re exactly the target user for something more modern and robust like Disk Drill. It handles structured recovery and previews a lot better, especially for many file types on a busy system drive.
If you ever find yourself wondering about other tools in this space, there’s a decent comparison here of different data recovery solutions that go beyond what Recuva can handle. That’s useful if you want to see how Disk Drill stacks up against other commercial options too, not just Recuva.
Bottom line for your deleted folder: try not to write to that drive anymore, use Disk Drill from another disk, and only pay once you’ve confirmed it can actually see and preview the files you care about. Recuva is fine as a free experiment, but for “this actually matters,” Disk Drill is the one I’d rely on.